If you’re searching for a clear, practical sous vide cooking guide, you likely want more than just a definition—you want to understand how it works, what equipment you actually need, and how to get restaurant-level results at home. This article is designed to walk you through the essentials of precision temperature cooking, from setup and timing to flavor optimization and food safety.
We break down the science behind sous vide in simple terms, explore how smart kitchen tools enhance consistency, and share tested techniques that eliminate guesswork. Whether you’re experimenting with your first immersion circulator or refining your process with app-connected devices, you’ll find step-by-step insights tailored to real home kitchens.
Our approach combines hands-on testing with proven culinary techniques and modern kitchen tech integration, so you can cook with confidence, precision, and repeatable results every time.
Unlock Restaurant-Quality Results in Your Kitchen
Sous vide (French for “under vacuum”) is a precision cooking method that seals food in a bag and immerses it in temperature-controlled water. Instead of guessing doneness, you set an exact degree—say 129°F for medium-rare steak—and the water bath does the rest. No overcooked edges. No raw centers. (It’s like autopilot for dinner.)
Skeptics argue it’s too technical for home cooks. Fair. But modern immersion circulators make setup almost plug-and-play.
- Pro tip: Season before sealing for deeper flavor infusion.
In this sous vide cooking guide, you’ll master repeatable results—and speculation: soon, smart kitchens may auto-sync cook times to your fridge inventory.
The Science of Precision
Sous vide (French for “under vacuum”) means sealing food in a bag and immersing it in a water bath set to the exact final temperature you want your food to reach. If you want steak at 54°C medium-rare, the water stays at 54°C. No guessing. No hovering over a pan.
Here’s the benefit: the food cannot overcook. Unlike ovens or stovetops that spike and dip in heat, water transfers energy evenly and gently. Once your food reaches the target temperature, it stays there—perfectly cooked from edge to edge. Think of it as cruise control for dinner (set it and relax).
Modern immersion circulators act like smart thermostats for your pot, holding temperature within 0.1°C. That level of precision used to belong only to restaurant kitchens.
Follow a trusted sous vide cooking guide, and you gain consistency, confidence, and repeatable results—whether it’s salmon, steak, or even custard.
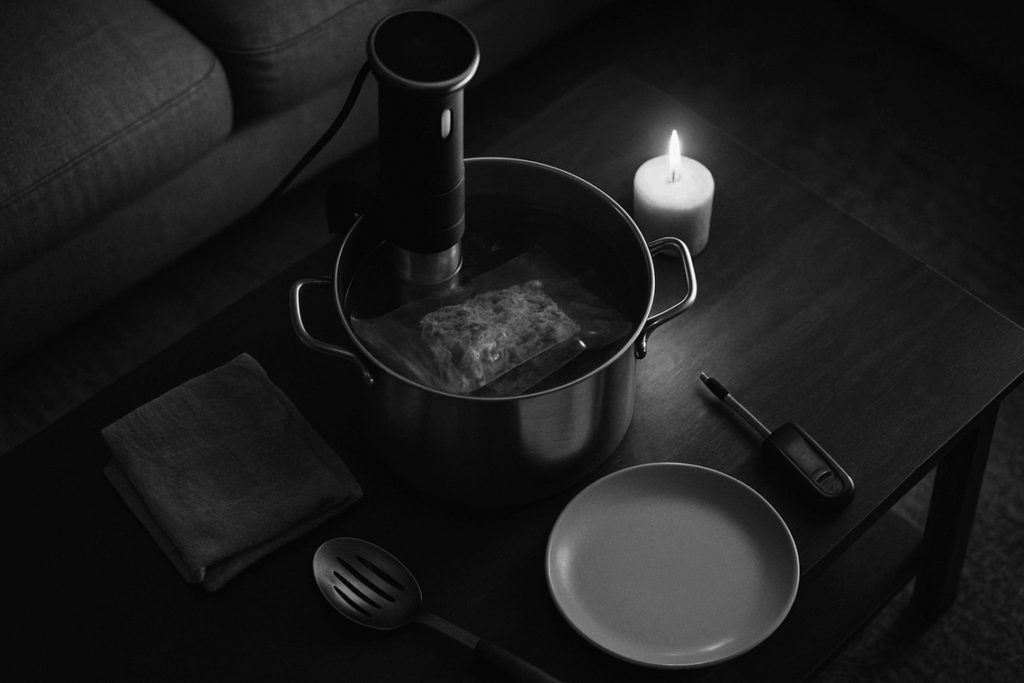
Your Sous Vide Toolkit: Essential Gear for the Modern Chef
As you embark on your sous vide journey, be sure to check out our comprehensive Food Guide at Tbfoodcorner for essential tips on choosing the freshest ingredients to elevate your precision cooking experience – for more details, check out our Food Guide Tbfoodcorner.
A great sous vide setup starts with the immersion circulator—the device that heats and circulates water to a precise temperature. Look for higher wattage (which means faster heating), strong flow rate (how well water moves for even cooking), and smart features like Wi-Fi or Bluetooth for app control. If you’ve ever overcooked a steak by “just eyeballing it,” you’ll appreciate precision down to a single degree.
Some argue smart features are unnecessary. Fair—but remote monitoring is incredibly practical during long cooks (think 24-hour short ribs).
Next is the sealing method. A vacuum sealer removes air completely, making it ideal for long cooks and freezer storage. Budget option? Use the water displacement method: seal food in a zip-top bag, slowly lower it into water, and let pressure push the air out before sealing. It’s beginner-friendly and surprisingly effective.
For the container, a polycarbonate tub retains heat better and reduces evaporation. A stockpot works fine to start (pro tip: cover with foil to minimize water loss).
Finally, don’t forget finishing tools. Sous vide ensures perfect internal doneness, but you still need a blazing-hot cast-iron skillet or torch for the final crust—the sear. That contrast is what makes it restaurant-level.
For deeper experimentation, explore exploring molecular gastronomy techniques for modern kitchens.
Follow a reliable sous vide cooking guide and test with thick-cut pork chops first.
The 5-Step Sous Vide Masterclass: From Prep to Plate
Think of this as your no-stress, crystal-clear sous vide cooking guide—no chef jargon required.
Step 1 – Season and Seal
Season lightly. That surprises people. Because sous vide cooking happens in a sealed bag, flavors don’t escape the way they do in a pan or oven. They intensify. Salt, herbs, garlic—all become more pronounced. (Yes, even that extra pinch.)
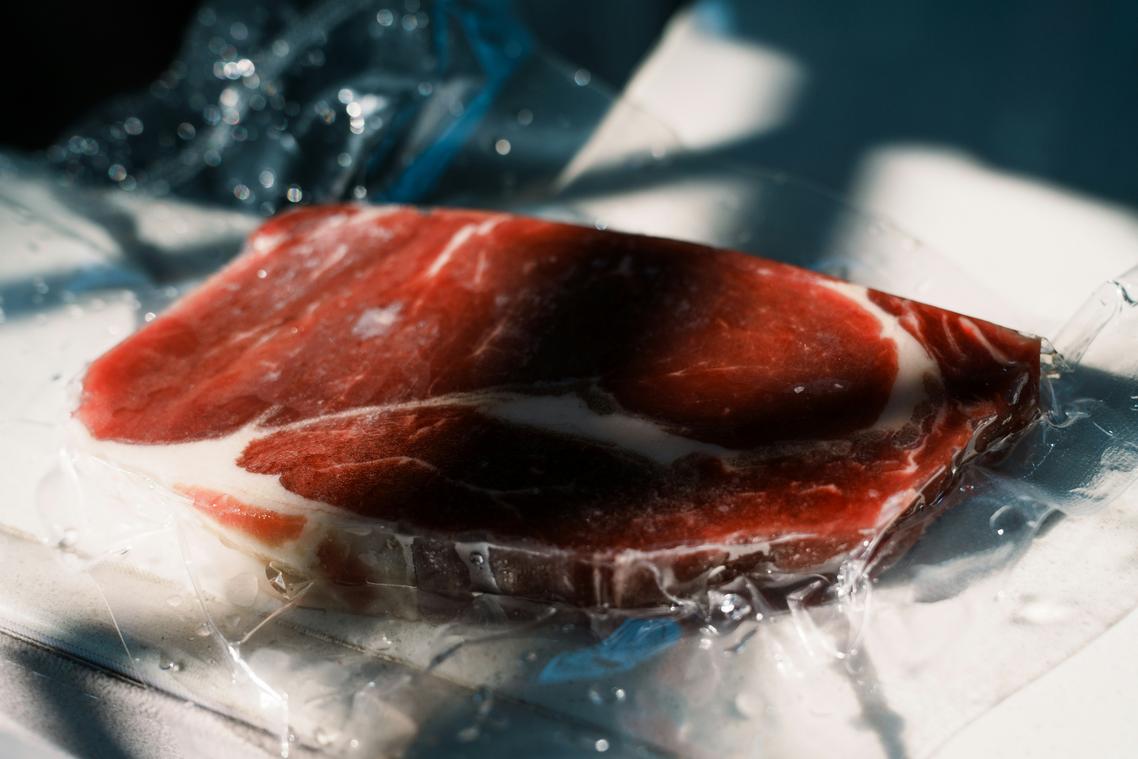
Place your food in a vacuum-seal or zip-top bag. Remove as much air as possible. Air pockets cause uneven cooking. If you don’t own a vacuum sealer, use the water displacement method: slowly lower the bag into water to push air out before sealing.
Less air equals better heat transfer.
Step 2 – Set Your Water Bath
An immersion circulator is a device that heats and moves water to maintain a precise temperature. Precision is the whole point here. Instead of guessing doneness, you choose it.
For example, steak at 130°F yields medium-rare. Chicken breast at 150°F stays juicy but fully cooked (USDA safe minimum is 165°F for instant cooking, but longer sous vide times allow safe lower temps, per USDA guidelines).
Set the temperature. Set the time. That’s it.
Step 3 – Submerge and Cook with Confidence
Make sure the bag is fully submerged. Floating bags cook unevenly. Use clips or weights if needed.
Here’s the magic: it’s “set it and forget it.” Unlike pan-searing, there’s no babysitting. Go watch an episode of your favorite show. Your food won’t overcook because it can’t exceed the set temperature.
Step 4 – Remove and Dry Thoroughly
This step confuses beginners. Why dry food that was just in water?
Because moisture prevents browning. A wet surface steams. A dry surface sears. Pat completely dry with paper towels.
Step 5 – The Perfect Sear
Heat a pan until it’s screaming hot. Add high-smoke-point oil (like avocado oil). Sear under 60 seconds per side.
You’re not cooking it further—you’re building crust. That deep brown color? It’s the Maillard reaction, the chemical process that creates rich flavor.
Fast. Hot. Confident. That’s the finish.
Your First Cook: Beginner-Friendly Sous Vide Recipes
Starting with sous vide can feel intimidating (new gadgets often do), but these beginner recipes remove the guesswork.
The Perfect Chicken Breast
Set your bath to 149°F / 65°C for 1.5 hours. The result? Juicy, sliceable chicken from edge to edge—no chalky center. If you’ve ever overcooked chicken while multitasking, this solves that problem completely.
Flawless Medium-Rare Steak
Cook a 1.5-inch ribeye at 131°F / 55°C for 2 hours. You’ll get consistent pink throughout, then just sear for a crust. Pro tip: Pat the steak very dry before searing for better browning.
Foolproof Salmon
At 125°F / 52°C for 45 minutes, salmon turns buttery and tender, never dry. It’s ideal for meal prep.
Game-Changing Poached Eggs
Cook at 167°F / 75°C for 13 minutes, cracked directly into the water. Expect silky whites and jammy yolks.
For timing tweaks and safety basics, keep a reliable sous vide cooking guide handy while experimenting.
Elevate Your Cooking Beyond the Basics
You now understand how sous vide turns guesswork into precision. I learned the hard way that skipping the drying step ruins the sear. My first steak looked gray and soggy (not exactly Instagram-worthy). The lesson? Patience and process matter. Follow the five-step flow from your sous vide cooking guide, especially dry, then sear.
Trust the thermometer, not your nerves.
- Embrace the rest time.
- Finish with high heat.
It is time to cook. Choose beginner recipe, set the bath, and taste what consistency means. (Pro tip: pat proteins bone-dry for better browning.) Trust me.
Elevate Every Meal with Precision Cooking
You came here looking for clarity, confidence, and control in your kitchen—and now you have it. With this sous vide cooking guide, you understand how precision temperature, smart tools, and modern techniques eliminate overcooking, guesswork, and inconsistency.
No more dry steaks. No more underwhelming textures. No more wasted ingredients. The frustration of unpredictable results ends when you cook with accuracy and intention.
Now it’s time to put this knowledge into action. Start by setting up your immersion circulator, choose a simple protein, and follow the temperature and timing principles you’ve learned. Experiment, refine, and integrate smart kitchen tools to streamline your workflow.
If you’re ready to transform inconsistent meals into restaurant-quality results every time, explore our expert-backed tech-driven cooking resources and smart kitchen insights. We’re trusted by home innovators who want precision without complexity.
Take control of your kitchen today—embrace precision, upgrade your tools, and start cooking smarter.
 Anthony Fosteraliero is a key strategist at Tbtechchef, dedicated to bridging the gap between professional-grade hardware and the home kitchen. With a focus on performance metrics and technical durability, he oversees the rigorous testing of smart appliances and gastronomic tools to ensure they meet the demands of a high-tech culinary environment. Anthony’s analytical approach helps demystify complex kitchen ecosystems, providing users with the data-driven insights needed to optimize their workspace for maximum efficiency and precision.